Watercolor Kit Unboxing and Review
Is it possible to have all the supplies you need to start watercolor painting delivered to you in one kit? Let's see! I unboxed and reviewed the Home Hobby By 3L Watercolor Studio Kit and tried following one of their step-by-step guides on how to paint an ostrich in rainbow colors. Watch the watercolor kit review video or keep reading.
What is Home Hobby By 3L?
I got an email from 123-creative.com, which is an online store that sells Home Hobby By 3L art and crafts products, saying that they'd like to send me one of their new watercolor kits to review on my YouTube channel. So, they kindly sent me this kit for free. However, the video is not sponsored and they did not ask me to make this blog post. I just wanted to share this on the blog, too.
They have multiple watercolor kits and reading through the product info, I noticed they all have the same supplies and the difference is in the instructions included in the kits. So, the basic kit has just the supplies and the others have different step-by-step instructions based on your level. The price is based on how many instructions are included. The one that spoke to me the most was the ostrich so I got that advanced watercolor kit.
The division of the kits to beginner, intermediate and advanced seems to be based on the difficulty level of the step-by-step guides and not about a difference in the quality of the paints.
 |
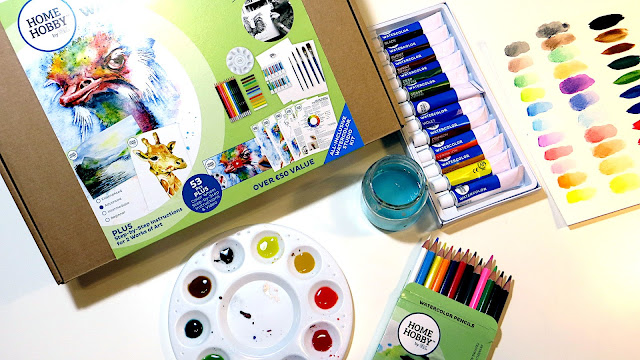
| The Advanced Watercolor Studio Kit and some of its contents. |
Contents of the watercolor kit
The kit includes the guides, a paint mixing tray, a brush set, 12 watercolor tubes, a set of 12 watercolor pencils and a set of 12 watercolor pastels as well as a pencil sharpener and a watercolor paper pad.
The brush set includes five different sizes. The big brushes are nice, the big flat one is good for a background wash. I do like small brushes for details and the smallest one they included was size 4, but if it holds its shape well, it's fine for details.
This was my first time trying tube watercolor paints. I had only used pan watercolors before. They say not to let the paint dry in the mixing well, but I'm not sure why. They also sell acrylic paints, so could this part of the instructions be directed for acrylics rather than watercolor?
The pastels unfortunately arrived a bit broken and dirty, but I cleaned them with rice afterwards and they were fine. Overall, I'd say all of the plastic packaging was quite dusty, but the products themselves other than the pastels, were clean.
 |
| The set included everything from paints, pencils, paper, palette and brushes to instructions. I only needed a water jar, masking tape and a surface to tape the paper onto. |
The sharpener has two holes, a bigger and a smaller one which I like, although I don't think there's anything in this kit that requires the bigger hole, but it's still useful to have for other supplies.
There's a color wheel included in this kit that tells you exactly which colors you need to mix from the tube watercolors in this kit to get the results you want. I think it's a helpful addition, but you can can of course paint the same color wheel on your own and refer to that, too.
The watercolor paper pad has 10 sheets of acid free cold press 300 gsm watercolor paper, which I think is quite a good thickness. There's a bit of texture, but not too much. It's a bit of an off-white compared to my other watercolor papers.
I tested out the watercolor pencils, pastels and paints, so you can see how they look compared to each other and how well the pencils and pastels blend or dissolve with water.
 |
| Swatches: watercolor pencils, watercolor pastels and tube watercolors. |
The colors are almost the same in each set so you can sketch and paint over it with a matching color if you want. The pastels are a little more opaque than the watercolor pencils and how well they dissolve differs a bit from color to color.
With the watercolor paints I was actually surprised how opaque they were. As I said, I've only used pan watercolors before and I think this level of opaqueness would be hard to achieve in one layer with the pan watercolors I have. I did use very little water for these swatches though, and added more water for the actual painting.
Watercolor guides and tips
Besides the step-by-step guides, they also give you little tips like if the paper buckles, you can re-wet it from the backside and let it dry flat. I've heard that tip before but I haven't tried it yet. I do like that they include tips like this that can be very useful especially for beginners.
The instructions said to stretch the paper beforehand to prevent the paper from warping or buckling when it dries and that they have tips on how to stretch the paper on their website. They do in fact have both helpful blog posts and YouTube videos.
They suggest stretching the paper by taping down the paper on a hard surface with masking tape and then wetting it with a large brush and letting it dry before painting, so I tried that for this painting. I think it's best if you can stretch it wet and tape it down with gummed paper tape, but since it's not included in the kit and I don't have gummed paper tape yet, we'll go with the technique they suggested.
 |
| Beginning of the ostrich watercolor painting. |
Abstract watercolor ostrich
Since the ostrich was what caught my eye in the first place, I'll try following that step-by-step guide. The instruction booklet that came with the set, includes a few images of different phases of the painting and a bigger image at the end. This kit included one advanced project which was the ostrich and two intermediate projects. The giraffe came with an outline sketch so you can even trace it, if you'd like and then follow the painting instructions.
I also watched the YouTube video of this painting for some more guidance. So, you can find the same information that's on the printed instructions in their blog and videos, but having the printed instructions and the big image of the finished painting physically at hand can be useful too. It's cheaper to get just the supplies without the physical instructions, though. And you can even get any of the supplies separately in their online store, if you don't need the whole kit.
 |
| I used the watercolor pencils and tube watercolors for painting this rainbow colored ostrich. |
I found this bird painting interesting, because it's kind of realistic but with abstract colors. I like these types of paintings, but I've never made one myself so I thought why not try it now.
Also, I didn't swatch the white pencil, pastel and paint earlier, but I did use the white paint in this painting and it was surprisingly opaque like the other paints, too. I would generally use an acrylic paint to add white details over a watercolor painting, but I didn't have to do that here.
As for the stretching method, the paper did buckle a bit once it dried. I did paint quite a few layers, so if you're painting something more simple, it might be ok. Besides watercolor, they also have kits for sketching and acrylic painting, if you want to check those out.
 |
| Watercolor ostrich and watercolor swatches. |
Where to buy the kits or individual supplies?
- HomeHobby By 3L art kits on *Amazon (US)
- HomeHobby By 3L watercolor supplies on *Amazon (UK)
- HomeHobby By 3L shop
(Links marked with * are affiliate/referral links that let you support the blog at no extra cost to you.)


Comments
Post a Comment