How to Make a Transparent Background in Photoshop
Want to remove the background of your artwork, design or photo? I'll show you how to turn the background of your artwork transparent using Photoshop, so you can use it as a sticker or a t-shirt design or a repeating pattern for your print-on-demand shop, such as Redbubble. You can watch the Photoshop tutorial video or keep reading.
If you don't have Photoshop, you can start a free 7 day trial, which you can cancel at anytime before the 7 days are up. Adobe also has student discounts and different bundles and offers, which I'll link to below, if you want to buy a Photoshop subscription.
Disclaimer: Links marked with * are affiliate/referral links that let you support the blog / YouTube channel at no extra cost to you, if you make a purchase through them.
- *Start Free 7 Day Photoshop Trial
- *Students Save over 60% on Adobe Creative Cloud
- *Start Free 7 Day Creative Cloud Trial
Select the background
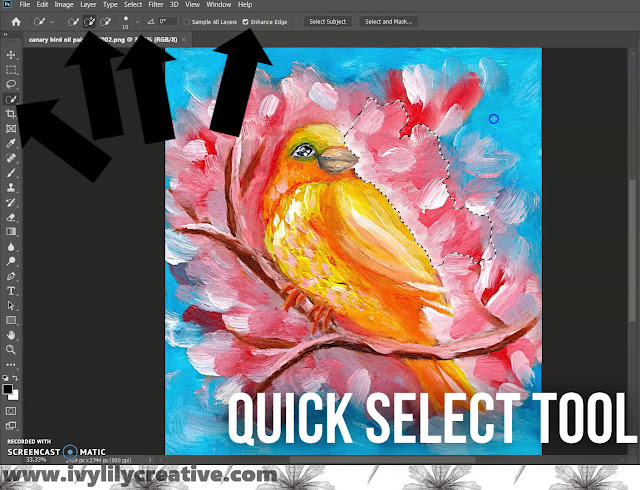
We'll use the Quick select tool, so let's choose that from the left toolbar. Make sure the Edge detection is checked. You can also change the brush size. Make it smaller, if you want a more precise edge. Also, notice the three different brush images in the top bar. I have Add to selection chosen, but you might have Create new selection chosen, which is fine.
To select an area, just paint over the background with the mouse and Photoshop will detect the edges of the background and add parts of the background to the selection as you go.
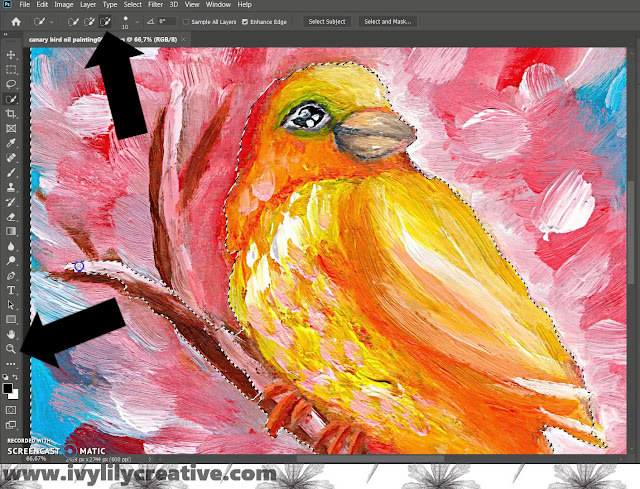
If you have a clear difference between the background and foreground, your selection might be perfect, but mine isn't. Some areas I want to keep were added to the selection that I'll be removing later. So, to deselect those you can either press alt while painting with the mouse or click the Deselect icon in the top bar which is the brush with the minus sign. I'm going back and forth between selecting and deselecting to get the tail of the bird and the whole branch out of the selection.
You can use the Magnifying tool to zoom into the picture to see the edges better, and again press alt while using it to zoom out.
Adding a transparent layer and removing the background
When you're happy with the selection, let's remove the background. To create a transparent layer under the image, I'll right click the image layer in the Layers tab and choose Duplicate layer. Click Ok, and then click the eye icon of the bottom layer to hide it. This creates a transparent layer.
Now, make sure you have the top layer selected and then press Ctrl x to remove the background you selected with the Quick select tool. And you can undo with Crtl z, if you needed.
Fixing up with the eraser tool
For a traditional painting like this, the result is pretty jagged. I'll show you how to use the eraser tool to fix it up. You can see the edges better and check for any rogue leftover pixels by adding a solid color background.
Add new layer from the plus sign in the downbar.
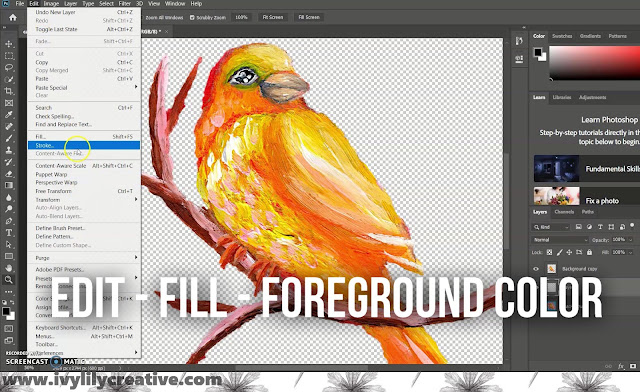
Color it by selecting the color in the Color picker. Use a contrasting color compared to your image. I'll use a black background, 'cause the image is quite light. Then go to Edit - Fill - Foreground color. Now you can see the edges better and mine do not look good.
Select the Eraser brush from the left toolbar and set the brush size and hardness. I'm making the size pretty small and using a hard brush. Now use the eraser to smooth out the edges.
Exporting and saving the image
When you're done, make the background color invisible by clicking the eye icon next to it in the Layers tab. And make sure to save the image as PNG to keep the transparency in the background. If you save it as JPEG, you'll get a solid color background. It might also be a good idea to save the PSD Photoshop file, if you'd like to use the layers later.


Comments
Post a Comment